I’m sure you’ve seen it before, that blogger flaunting their 6 or 7-figure income all from running a blog.
They make it seem so easy to make money online, and you’re probably asking yourself, “How Do I Start A Blog that actually makes me money???”
Well, guess what?? If you want to know how to start a blog that actually makes you money, you’re in the right place!!
Starting a blog requires some time and effort on your part, but I’m going to show you exactly how you can get started today!
Is Starting A Blog Hard
This is a pretty common question that I get about starting a blog, “Is it hard?”
The short answer is no.
The long answer is you need to put in the time and effort to always keep learning. Unless you’re currently working in the digital marketing field, there’s going to be a learning curve and if you want to be successful, you’ve got to learn a lot!
Later on in this post I’ll share some of my favorite blogging resources to help you shorten the learning curve but before that I’m going to help you get your website started.
Blogging for us started as a hobby, sort of a way to share our story of chasing down the ever-elusive thing called Financial Freedom.
It gives us a way to share our tips and tricks for budgeting, saving money, and unique ways to make more money with thousands of people every month.
Even though our blog started as a hobby, it’s evolved into a full blown business!
You might not realize this, but blogging can actually turn into a money-making business.
That’s right you can make serious moneyblogging! I’m not talking about chump change like 20 bucks a month, I’m talking serious cold hard cash!!
Shortly after our 2 year blogiversary, we made over $22,000 in a single month! We had several months where we’ve made $12,000. On average, we’re making between $3-5k per month!!
Check out the snapshot below for one month of blogging.
In the last year, our blogging gross income exceeded David’s salary 9-5 job by a significant amount and it’s not a full-time job for us. We put in about 3-4 hours per day on our blog.
We’re living proof that you can make money blogging if you put in the time and effort. If we can make money blogging, so can you!
How To Start Your Blog Today
When you compare starting a sticks and bricks business to starting a blog, starting a blog is really inexpensive.
We’ll get to the cost of blogging in a bit but for just a couple bucks a month, you can start your blog in as little as 24 hours!
When you’re looking to start a blog, you first need to think about a web hosting service.
To understand web hosting, think of the internet as a city. Within the city, there are different neighborhoods (web hosting services), and in one of those neighborhoods is your house (your blog).
Your blog is formed on a web hosting server so that it can be shared on the internet.
I know, I know, It’s all starting to make sense now, isn’t it?
Like neighborhoods, there are the web hosts you want to be in and ones you just want to avoid.
Bluehost is one of those web hosts you want to be with when you start out! Bluehost is one of the best, and most affordable web hosting sites to start your blog with.
We started our blog with Bluehost for our web hosting, and it was a great experience!
There are so many things to love about Bluehost. Some of the reasons you shoulduse Bluehost include:
WordPress is FREE and can be installed with 1-click
24/7 tech support that is super quick to fix issues
You get a much more professional look to your site
Why Choose Bluehost For Your Site
Now you’re probably asking yourself, why would I pay for WEB HOSTING when there are sites that offer it for free?
Let me just say, nothing that’s good in life is free. You can kick off your blogging career with a free hosting service, but you’ll quickly realize that was a mistake and be heading to Bluehost shortly afterward.
Bluehost is going to offer better privacy protection that you WILL NEED. Without that, your personal information is out there for the world to see.
When your blog takes off, you don’t want others to be able to access your home address and other personal information about you online.
Privacy protection is a must!
Bluehost also makes sure monetizing your blog will be super simple!
Many advertisers look at blogs set up on free hosting sites as too risky due to the less professional look or lack of security.
If you want to make money with your blog, you will find it easier to get ads and affiliate links for your site if it’s nice and secure.
If your goal is to make money with your blog, invest a few dollars a month in a good web host because what’s an extra $2.95 a month if it sets your blog up for success?
Bluehost also offers free WordPress when you choose them for hosting. Using WordPress for your blog will make your life, and setting up your blog, so much easier.
WordPress is powering over 74 million sites, so I’m not the only one that thinks it’s great!
Before we go any further into the tutorial, now is the time to decide.
If it seems overwhelming, hang in there, I’ll show you it’s not.
Keep reading to see just how easy it really is to start a blog.
If you’re ready to start your blog and want to follow along with the Tutorial then use ourBluehost linkand click the “Get Started” button to choose your plan.
Don’t spring for the more expensive plans yet, you can always change them later. For now, choose the Basic plan and you will be good to go.
Once you select your plan, it’s time to register your domain name.
The domain name is your web address. For example, our domain name is LivingLowKey.com.
When starting a blog, take some time and think through your domain name before registering it. Once you register your domain name, you can’t change it.
We probably spent two weeks going back and forth on different names until we decided on Living Low Key. It just stuck with us, and we kept coming back to it.
So make sure to take your time! Remember, your domain name is one thing you can’t change.
Things to Keep In Mind When Choosing A Domain Name:
Find a domain that you love and then give it a day or two to think it over.
Do research on the domains you like to make sure they aren’t taken yet.
You can do a domain search here! Just type in the domain you want, and it will tell you if it’s taken.
Keep in mind that you will want your domain name to be something that will relate to the niche your blog belongs to.
When people see your domain name, it should give you a little bit of an idea of what your blog is about.
Step 2: Choose Your Hosting Plan
Once you register your domain name, you will have to pay. You’ll need to fill out the info and then choose a length of time for Bluehost to support your blog.
There’s two options you can choose from for the length of time your site will be hosted. You can either choose 12 months or 48 months. You’ll notice the 48 months is more expensive.
Here’s the super-secret tip…
Pretend like you’re going to close the Bluehost wepage but don’t actually close it out. You’ll likely see a window pop-up offering you a discount to stay.
As of the time I wrote this, they were offering 36 months at $2.65 per month!! That’s a huge savings!!
I know you might be jumping into this thinking you’re only going to try it for a year but I would recommend at least trying it for 2 years. Blogging is a long game, and you have to give it time to grow in order to see the big returns.
It took us two years to finally have a breakout month where we made $22,000!! If you stick with blogging and continue to learn new things, you’ll be able to get there too!
Anyways, when you choose your hosting, there are several extra options you can add to your plan. I recommend privacy protection to keep our identity safe.
Like I mentioned above, Privacy Protection will prevent your personal information from being spread around the internet.
We had to learn this the hard way, take our word for it, and get the protection upfront.
You’ll have to pay the whole amount up front, so be ready for that.
Step 3: Installing WordPress
This is the step where things start getting exciting!! When you sign up with Bluehost, they make this step very easy, and best of all, it’s FREE!
The first thing you will need to do is create a username and password. Write these down somewhere, so you don’t lose them.
Next, Bluehost is going to direct you on how to install WordPress. I’ll let you in on a secret, it’s really easy.
Once WordPress is installed, you’ll want to pick a theme for your webpage. The theme is essentially a package of coding that creates what your website will look like to visitors. There are a few free themes on WordPress that you can use.
If you don’t like any of the free themes on WordPress, you can choose a paid version. Search the internet for blog themes you love!
We opted to go with the Mai Chic theme from BizBudding.com and we love the way it looks.
We love blogging so much we decided to go ahead and start a second one. When we started the 2nd blog, we went back to BizBudding for another theme.
Choosing a pre-made theme is the easiest and quickest way to get your site up and running.
However, if your budget isn’t quite ready for a paid theme, a pre-made free theme will work just fine and is provided for you once you are signed up.
Step 4: Building your Website
You did it!!
You signed up for hosting, installed WordPress, chose a theme, and now you’re ready to start designing your site and sharing content.
But where do you start?? That was the first thing we asked ourselves when we started, how do we use this thing we just created.
It may seem overwhelming, but we are here to help!
I’ll walk you through how to use some of the functions on your WordPress blog below but I’ve got a secret weapon to jump starting your blogging business.
If you want to get your blog started the right way and have your business bringing in $1,000 per month in no time, then you need to check out the Launch Your Blog Biz course from Create and Go.
There are A TON of blogging courses out there and it’s easy to get distracted by the fancy sales pages and claims to make you rich. I can honestly say that Launch Your Blog Biz is going to be well worth your money.
I’ve taken several of the courses from Create and Go and they are AMAZING!! I’ve seen our product sales more than double since taking their Six-Figure Bloggercourse.
Anyways, the first thing you will see when you log in to your site is your Dashboard.
The Dashboard is where you will do all your behind the scenes work on your website. You’ll want to get very familiar with the dashboard and what you can do with it.
Let’s get into some of the tools you will find on the dashboard so you can build a foundation of knowledge to work off of.
Creating Blog Pages
Before you start writing content you need to have places to put it on your site. Let’s start by creating pages.
If you look at our site, Living Low Key, you will see a row of Title Buttons at the top of the homepage. Each one of those buttons are “pages.”
When you’re in your WordPress dashboard, you’ll see options on the left-hand side. One of those options is Pages.
Click the pages button and create a new page.
You’ll need to create a page title and decide how you want to put posts on the page. Make the title something catchy that describes the category of articles you’ll find on that page.
When you’re creating pages on your site, try to create groups that fit in your niche. For us, our areas of focus are SAVE MONEY, MAKE MONEY, and FAMILY FINANCE.
Think of the Page Titles as categories for each of the posts you will eventually write. You’ll want the posts to fall into one of your categories.
These groups should be distinct so that when Google crawls your site, it knows exactly what you’re all about. Try not to create too many categories or Google will have a hard time figuring out what your site’s niche is.
Creating Blog Posts
This is what you’re here for, it’s time to start writing great content and getting it out there for the world to see!!
On the left-hand side of your dashboard, you will see a “Posts” option. Hover your mouse over that and click “add new” to add a new post.
Once you create a new post, you need to give it a title and then start writing!!
Things to keep in mind when writing posts:
– Keep the focus on helping your readers – Make it engaging – Make it easy reading, keep paragraphs short – Use correct grammar and spelling – Use Search Engine friendly titles and keywords – Write at least 1500 words, the more, the better – Use pictures in your posts
Once you have the content of your post created, make sure you hit that PUBLISH button so your readers can see it.
When you’re creating posts, you should be writing them for one of the pages you created above. Think of those pages like grain silos, and your post is the grain. You want the right grain in the correct silo.
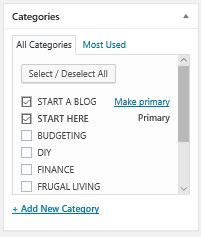
You’ll want your posts to end up in the right silo so that your readers can find the right info they need. You should also create categories. This option can be found under the posts button on the left side of your dashboard.
I recommend you create category titles that match your page titles.
Here is how this will help you.
Say you have Finance, Start A Blog, and Start Here pages on your blog and you write a post that falls under Start A Blog. How do you get it to go under your Start A Blog page?
If you create categories that match your pages, all you have to do is look at the right side of your screen. There is a box called categories.
If you made categories that match your page titles, just check the box like the picture above, and it magically appears on that page.
Simple as that!!
Adding Pictures To Your Blog Post
If you want to add pictures to your blog posts (which is highly recommended), here is how you do it.
First, create a block made for images
Click the Upload button
Upload an image from your computer
Fill in the Alt Text box with words that are optimized for Google Searches
Choose the size of the picture (your blog theme should have specific image sizes that work best)
Click insert into post
The thing to keep in mind with images is you want to use small image sizes. Large images will slow down your site and that’s bad for user experience.
Website Plugins
Plugins are essentially little tools you can use to customize your site. Unless you know how to code, plugins will be your best friend.
They’re little packages of coding that can be used to add new functions to your site or change the look of it.
Neither one of us is very good at writing code yet, so we use a handful of different plugins on Living Low Key.
When you see things on our site like Pinterest and Facebook share buttons, those are part of a plugin. When you see our email subscribe boxes or popups, those are part of a Plugin.
If you want something done with your site but don’t know how to do it, I guarantee a plugin can make it happen.
One of my favorite plugins that we use is the WP Rocket plugin. This plugin makes our site a lot faster, which is crucial for ranking in Google Searches.
You know how when you have a question about something and you go to Google to figure it, there’s a bunch of articles with exactly what you’re looking for, right?? Do you think they just randomly show up?
Nope! Google, in all it’s wisdowm, searches the internet for the best content to help solve your problem based on your search terms. Those search terms are called keywords and that’s the stuff you’ll want to load into your blog posts.
You need to be good at SEO and keyword research in order for your blog to be found on search engines like Google and Bing.
Keywords and titles will play a big role in how easily people can search for your blog or how high it ranks on a Google search. Doing proper keyword research should be the first thing you do before you even start writing.
Search Engine Optimization is one of the more complicated parts of building a successful blog but if you want to learn from the master, you have to check out Stupid Simple SEO. Mike Pearson has the absolute best course on SEO available to date and you’ll learn everything you need to know to start ranking in Google searches. Go Check Out Stupid Simple SEO Here!!
After you finish writing your post all the way at the bottom of the page is a box that has SEO information called the Yoast Plugin.
Here you can update the Meta Description (what people see when they find you on Google, the Slug (your post URL), and Post Title.
Yoast also gives you an idea of how your post is set up for SEO, but keep in mind it doesn’t guarantee it will rank, so don’t put too much thought into the scoring.
There is a lot to learn about SEO so take the time and learn about it.
If you want to learn more about SEO and driving traffic to your blog, like I said earlier I highly recommend checking out Stupid Simple SEO. That is the most in-depth course on SEO and helped us take our blog from 0 organic searches per month to over 15,000!!
Start an Email List
When we were learning how to start a blog, we kept hearing about starting an email list, and you will too!
Your email list is where you will connect with your followers. I highly recommend you work on your email list from the very beginning!
We’re using Convertkit for our email list, and it has been easy to use so far. The customer service has been very responsive to the questions we have, and we don’t have any complaints about it.
We’ve been growing our email list every week since we started this journey and we’re well over 10,000 subscribers now. I would highly recommend checking out ConvertKitwhen you want to start growing your email list.
ConvertKit has many different functions that will help you build your email list. The most important thing it does is set up subscription boxes on your webpage. That’s how you get email followers, they subscribe.
You can also give away freebies to entice people to subscribe.
Privacy Policy and Disclosure
This page is a very important one. Your blog needs to have a Privacy Policy and Disclosure page.
This page should cover what information you collect from readers, how you intend to use that information, whether or not you intend to share that information, any data collection that occurs, how you use cookies, and affiliate disclosures are some of the basics.
Having a solid privacy policy and disclosure pages will help protect you and your website. Make sure you have one, it’s required for acceptance into advertising programs where you start making real good money.
How To Blog Final Thoughts
There are so many different things you can do to customize your blog. Spend some time experimenting with different things until you find what works for you.
If you ever get stuck on anything, just do a quick search on the internet, and you will find the solution.
At this point, you should have some good groundwork for you to start a blog. One thing that we did when we launched Living Low Key was build up quite a bit of content, I think we had 15+ posts when we launched..
I won’t even say it was excellent content at the beginning… honestly, it was awful! BUT if we would have waited until we had perfect content, we wouldn’t be where we are now!
We spent the first three months of our blogging journey writing content and building our site before we even launched. You don’t have to do that. Honestly, you can launch your blog with one post on it.
The important thing is just getting your content out there for people to read!
The last thing that I will say is don’t give up.
There are going to be ups and downs. You will have to put a lot of time and effort into this to make it work. It’s not as simple as writing posts and people magically finding them. The first couple posts you write, the only people that will see them will be your close family if you choose to tell them about it.
DON’T GET DISCOURAGED!!!
The important part of running a successful blog is to make sure you’re , but if you stick with it, you’ll realize just how rewarding it can be.
Heck, maybe it will even be the start of a new career. One where you can work from home!
Now that you have your blog up and running, it’s time to learn about monetizing it!
Pinteresting Strategies: As a new blogger, you’ll quickly find out that Pinterest is the king of driving traffic to your new blog. If you’re struggling to develop a Pinterest pinning strategy, you’re going to want to check out the eBook, Pinteresting Strategies.
Carly Campbell has a terrific pinning strategy that helps drive traffic to your blog. We highly recommend checking out her book, Pinteresting Strategies if you’re new to the blogging world.
Making Sense of Affiliate Marketing: One of the best ways to make money from your blog is through affiliate marketing. Making Sense of Affiliate Marketing was created by Michelle from Making Sense of Cents. She makes over $50,000 per month on affiliate marketing alone.
This course covers everything from the basics of affiliate marketing, various affiliate networks, making sure you follow FTC rules, promoting strategies for your affiliate links, converting sales, and so much more.
Stupid Simple SEO: I mentioned earlier that Search Engine Optimization is the key to getting good organic traffic from Google or Bing, but it can be confusing.
Mike Pearson does an amazing job in Stupid Simple SEO laying out actionable strategies for you to generate traffic and have your site rank higher in search engines. I highly recommend this course!
Facebook Ads for Bloggers: If you want to learn how to drive highly converting traffic to your blog using Facebook Ads, this is the absolute best course for that.
Bobby and Mike show you exactly how they can drive really inexpensive traffic to their blogs to grow email lists, sell products, and generally make more money!
If you LOVED this article, save it for later and join us on Pinterest!
Leave your questions in the comments below and we will do our best to help you![disclosure]
Cassie is the founder of Living Low Key, a website devoted to finding financial freedom. A minimalist who believes in living on less and saving the rest. After paying off over $30,000 in debt, she has since helped thousands create budgets and pay off their debts. She is also passionate about helping others find their perfect side hustle, so they can quit their day jobs and live life on their terms.
I so wish I had read a post like this before I floundered around trying to get my blog up and running. This is a great comprehensive step by step to help someone get their website started!
The Pipps
Hi Lisa,
Thank you so much for the feedback! We felt the same way when we started so we wanted to help everyone else out. We have two more installments of our How to Start a Blog series coming soon. The next two chapters will discuss how to monetize your blog and how to promote it.
I like how you made it sound so simple, and it is! Too many people think you need to learn how to code and all that to set up a website but you don’t – not at all. I see you recommend Blue Host. I’m with Site Ground at the moment – is Blue Host better?
The Pipps
Hi Timothy,
We have only used Bluehost up to this point so we can’t really speak to how the two compare. We have really liked Bluehost so far and had a great experience all around. We have had a few issues where we needed to use Bluehost’s online chat to resolve a problem and the experience has been good every time. How has your experience been with Site Ground?


 Learn How To Make More Money With The Six Figure Blogger
I so wish I had read a post like this before I floundered around trying to get my blog up and running. This is a great comprehensive step by step to help someone get their website started!
Hi Lisa,
Thank you so much for the feedback! We felt the same way when we started so we wanted to help everyone else out. We have two more installments of our How to Start a Blog series coming soon. The next two chapters will discuss how to monetize your blog and how to promote it.
I like how you made it sound so simple, and it is! Too many people think you need to learn how to code and all that to set up a website but you don’t – not at all. I see you recommend Blue Host. I’m with Site Ground at the moment – is Blue Host better?
Hi Timothy,
We have only used Bluehost up to this point so we can’t really speak to how the two compare. We have really liked Bluehost so far and had a great experience all around. We have had a few issues where we needed to use Bluehost’s online chat to resolve a problem and the experience has been good every time. How has your experience been with Site Ground?