

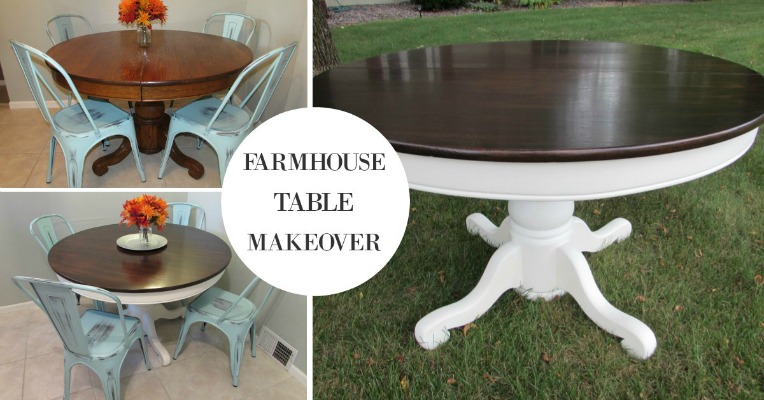
Are you ready to transform your table into a DIY farmhouse table for real cheap!?
I am so excited to share with you the exact steps to paint a farmhouse table. Also, I can’t wait to show you how our Farmhouse kitchen table turned out!
I think you’ll love it just as much as I do.
After this table received almost 200,000 social shares, I decided to lay out step-by-step exactly how I did it, so you can replicate it if you want to!

Backstory On Our Chalk Paint Kitchen Table
Everyone dreams of moving into their first home and buying brand NEW furniture, décor, and so did we…
Until we went shopping for new furniture, that is.
We live on a budget and were in our 20’s with two small kids; there was no way I was going to spend $1,000 on a new kitchen table.
So we decided to get crafty. Before kids, my husband and l hand-built a farmhouse table; however, our current home was too small for it, so we ended up gifting it to a family member.
So we took a step back and decided to get back to our crafty ways and repurpose an old inexpensive table.
We started searching thrift stores and Facebook Marketplace for the perfect table. It didn’t take long for my husband to find this perfect inexpensive antique oak farmhouse table for sale on Craigslist.
My husband was convinced that this expandable farmhouse table would turn into something we’d love with some paint and a little work, so we brought it home.
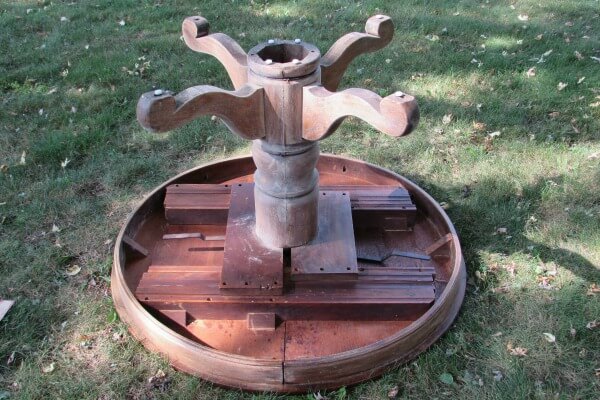
This solid oak table was extremely dated, and the base of the table was split down the middle. The table was supposed to slide apart to expand; however, it didn’t work properly, and the leaf of the table was in horrible shape.
We were told a gentleman handmade the table years ago. Who knows if it was true. But it makes a fun little story. I knew this table would turn out how I envisioned it in my head with a bit of determination.
We also couldn’t beat the $100 price tag!
Turn Your Old Table Into a Farmhouse Kitchen Table
Here are the steps to refurbishing an old oak table similar to the one above.
You can use the same steps for just about any wood table. This DIY farmhouse table makeover will have your kitchen table looking like an expensive Pottery Barn farmhouse table for only a fraction of the price.
Many people make money flipping the furniture they refurbish as well. If that interests you, here is a free resource that teaches you how to make $100 in your first week flipping furniture!!
Supplies for my White Farmhouse Table
Here is everything you need to achieve the dining table farmhouse-style look. You might currently have some of these items, so shop your garage before hitting up Home Depot.
< 3M 80 grit Sand Paper
< 3M 150 grit Sand Paper
< 3M 220 grit Sand Paper
< 3M 400 grit Sand Paper
< Tack Cloth
< Varathane
< Varathane Semi-Gloss Polyurethane
< Americana Décor Chalky Finish Everlasting
< Americana Décor Crème Wax
< Power Sander
< 1 Paint Brush
< 3 Foam Brushes
< Plastic Gloves (Optional)
< Cloth
< Painters Tape
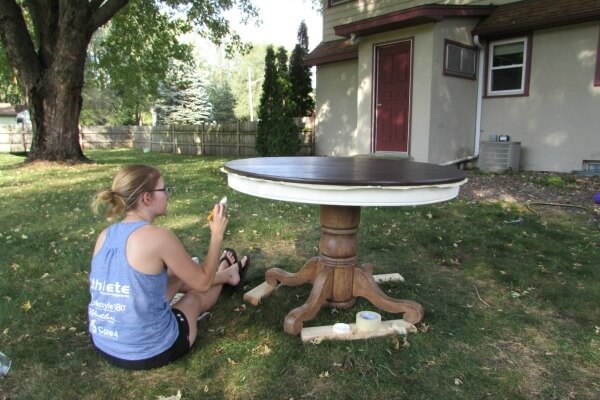
The first thing you want to do before starting is to give your table a nice little scrubbing.
We have kids, and we used our table for a few months before I had time to conquer this project, so a good cleaning was a must. I recommend using a heavy-duty cleaner like TSP.
Once your table is clean, it’s time to move your table outdoors or to any ventilated space.
It’s going to get a little messy and will take several days to finish.
Tip: Be prepared to be without a table for a few days during your dining table makeover.
Related articles:
- 15 Dollar Store DIY Fall Decor Ideas That You Must Try
- 14 Inexpensive Front Porch Decor Ideas You Need To Try This Fall
- The Dollar Tree Store Should Be Your One Stop For Everyday Essentials
- How To Organize Your Kitchen With These Brilliant Hacks
Sand Your Farmhouse Kitchen Table
Start by sanding the top
I may or may not have crawled under the table and sat for a good 10-15 minutes before it dawned on us to flip it upside down, so we wouldn’t kill our backs.
We started with a piece of 80 grit sandpaper and began hand sanding the base of the table.
It’s surprising how fast most of the varnish came off under that rough 80 grit paper.
With the base layer of varnish removed, use the 150 grit followed by the 220 and then 400 grit sandpaper to get a nice smooth finish.
You can use any combination of sandpaper, that’s just our preferred method, and it worked quite well.
You can play around with whatever combination of sandpaper you want. The lower the grit, the more course and grittier the sandpaper will be. We tried starting out with the 150 but switched to the 80 because it wasn’t taking off all the varnish.
Once you’ve finished sanding, use a cloth to wipe off all the excess dust. Any old piece of cloth will work.
Then use a tack cloth to wipe down the base thoroughly. If you haven’t used a tack cloth before, it might just become your new best friend.
These
These tack cloths are great for picking up any dust on your project before you start staining. I use them all the time, and they are pretty cheap on Amazon.
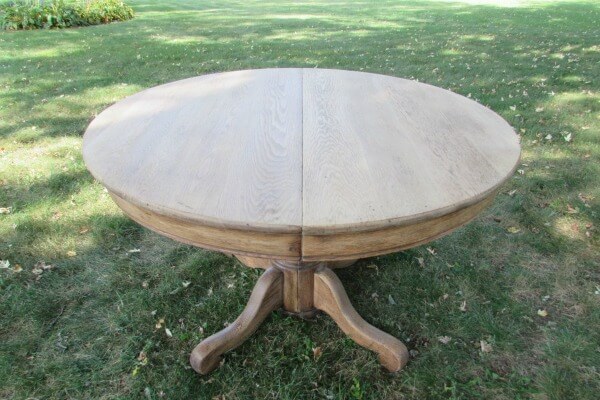
Now it’s time to flip over the table and sand the top. This is where the electric sander comes into play. These sanders are relatively cheap and definitely worth the money, especially if you plan to do other projects around your house.
Use the same method with the sandpaper and the electric sander, 80, 150, 220, and 400 grit. It took around two hours to get all the varnish off both the top and base of the table.
Staining Your Rustic Farmhouse Dining Table
Now on to the fun stuff!! Let’s see this table transform.
You can use any color of stain on the top of the table. We used Varathane KONA Wood Stain.
I personally love this color stain. We have used this color on multiple projects, so it’s always our go-to stain.
Don’t forget. I highly recommend wearing gloves.
Either pick up some cheap plastic gloves or use your kitchen gloves for washing dishes, if all else fails. You’ll be thankful you did when you’re done!
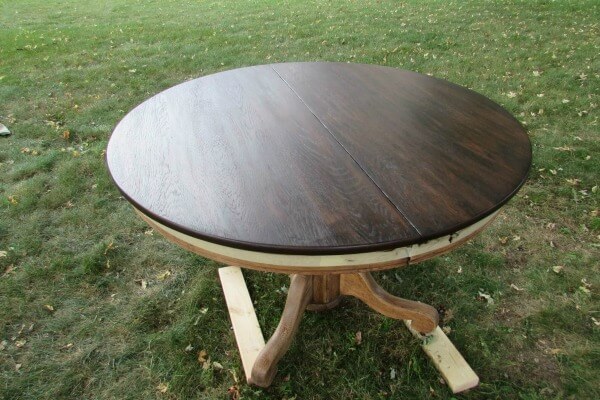
We taped off the table before staining the top so we wouldn’t get the stain on the rest of the table.
We used rags to apply the stain. Any small rag will do. You could also use a paintbrush or foam brush to apply the stain.
If you go the rag route, d
Make sure to use a cloth that doesn’t have fuzz all over it, such as cotton. (We made the mistake of using a cut-up shirt in the beginning).
Cover the table with stain using long strokes that follow the grain pattern. Let the stain sit for 5-10 minutes, then use a clean cloth to wipe all the excess stain off.
Repeat by adding multiple coats of stain until you achieve your desired color depth!
Temperature and humidity play a role in how fast a stain will or won’t dry. Keep the weather in mind if you’re staining outside.
Once you get your desired shade, you are done with the top.
All About That Base (Painting Furniture With Chalk Paint)
I knew I wanted a white base for our table, so I decided to experiment with chalk paint last minute. I went to Home Depot and bought the color Everlasting by Americana Décor. You can also buy it on Amazon.
I never thought I’d have a chalk paint table, but BOY do I love how it turned out.
I ended up putting three coats of chalk paint on the base of the table before I got the desired look I was going for.
What I love about chalk paint is that by the time I had finished applying the first coat I could start with the second. Chalk paint only takes 15 minutes to dry. Painting furniture with chalk paint has never been easier.
When I was done painting, I did one coat of Crème Wax just to seal the table. It goes on so easily, and it dries almost immediately.
Chalk paint tip: One benefit of using chalk paint is that you can get away without sanding if you plan to use chalk paint.
That’s right, if you are planning to DIY a farmhouse table from an existing table, sanding is not needed if you plan to use chalk paint. I didn’t know I was going to use chalk paint on my farmhouse oak table before I started this project, or I wouldn’t have sanded down the base.
Finishing Touches On Your DIY Farmhouse Table
Finally, it’s time to poly the tabletop. Polyurethane is a protectant, and I highly recommend you use it on your tabletop.
We like to use Varathane brand Polyurethane with a semi-gloss finish. This is our go-to poly because of the smooth finish it leaves and how easy it is to apply with a foam brush.
We did three coats to make sure it had extra protection since it’s a kitchen table.
If there are any rough spots between applying the coats, you can lightly sand it using 400 grit sandpaper.
Make sure to follow the wait times on the can in between applying the coats, and enjoy your new inexpensive farmhouse table!
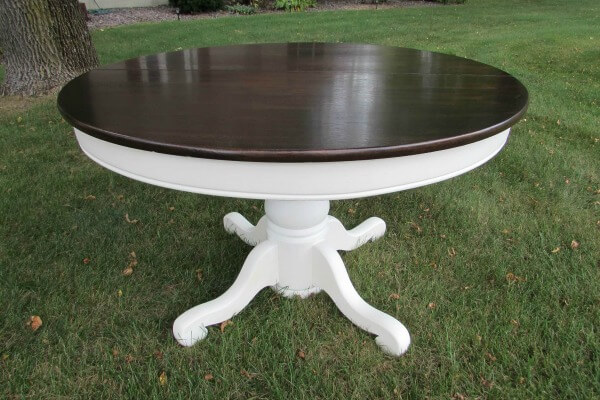
Our Finished DIY Cheap Farmhouse Table
Here is the finished product, our chalk paint farmhouse table.
Update: It’s been over five years since I repurposed our farmhouse kitchen table. It’s held up like a dream!
Once you have your refinished farmhouse table, you can pair it with some super cute decor to give it that true farmhouse feel!
Final Thoughts- Farmhouse Chalk Paint Table
What do you think, are you ready to attempt to repurpose a farmhouse-style table? If you want a Pottery Barn table but are on a budget, this is the way to go.
If you transform an old table into a DIY Farmhouse table, let us know how it goes in the comments below!
If you enjoyed this article save it for later and come follow us on Pinterest!

Related articles:
- Build This Budget Friendly Farmhouse Style Entryway Bench
- The Best Things To Buy At The Dollar Tree And What Avoid
- 13 Insanely Cheap Bathroom Organization Ideas Found At The Dollar Tree
- How To Declutter Your Home Quickly: Room By Room


 15 Cheap Date Night Ideas to Keep Your Relationship Exciting
couple questions:
wax is only for the bottom part where you have chalk paint, right?
and the polyurethane for the top (stained portion).
Thanks!
Hi Maria,
Great questions. Yes, the wax is to protect the base of the table where the chalk paint is used. The Poly is used on the top so you have a nice protective layer.
I hope that helps,
Cassie
Thank you so much for sharing ! I am Doing the exact same thing to my living room coffee table and end tables. I did exactly what you explained when staining the top and I am in love.
Thanks for checkout out our post! I’m glad you like the way your table turbned out!! We really like the dark color of the Kona Stain.
Love the table! I have the same exact set and will be starting the sanding process soon! My question, the chairs that go with our table, I plan to paint them with the chalk paint to match the base of the table. I assume I would use the same method as the base (no need to sand?) then finish with the creme wax? I’m trying to decide how much of the paint and the wax I should order. Thank you for this wonderful step by step! I’ve been wanting to do this for so long and your instructions are very helpful!
Hey Heather! Thanks for checking out the table and I’m glad you like it! It’s been a while since this project but I think we used 1 of the small containers of chalk paint and creme wax for just the table. If you’re doing chairs as well, I’d get 2 of each and that should be good.
I hope that helps and your table set turns out awesome!
Cassie
This is my weekend project! We are doing a table with benches. Do I need to sand the legs if I am using the chalk paint spray paint?
Awesome! Chalk paint doesn’t require sanding but we did a light sanding just to be safe. Have fun with your project!
Hi: I bought a Farmhouse Table jet like yours. plain solid wood. Do I need to prime this before painting. I love hoe yours looks. Thanks for the tutorial with pictures. So very helpful. Glenna
Hi Glenna,
We didn’t have to prime ours because we chose to use chalk paint. It goes on easily without priming. Thanks for checking out the post and I’m glad you like it!
David
Hi guys! I love your table and I’m currently doing mine, along with 4 chairs. I think I had some issues with sanding. I sanded all the way up to 220 (two stores I went to didn’t have 400 grit). I thought I had done a really great job on sanding the chairs, took my time and had it feeling sooo smooth. I went to stain it and it would NOT absorb. So naturally I went back with 80grit and it started to absorb. Lol! My question is do you think I sanded too much or possibly never got all the coating off although I felt like I had? I want to make sure I don’t mess the table top up as well as do all that extra work. Also, how long did you wait for the stain to dry before applying the poly? Thank you!
Hi Jennifer,
Thanks for reaching out. That’s strange it didn’t absorb if you started at 80 grit and worked your way up to 220. It’s possible that you didn’t break through the layer of poly that was on there before. The 2nd run with 80 grit probably broke through it. I would make sure you get it good with the 80grit and then work back up to 220. That should prevent you from having any other issues. As for the stain, we let it sit over night before we did the Poly. You want to make sure it’s completely dry before you poly it. Hope that helps!
Hi! Love this idea. Partner and I are currently in the process of this project, and we’re having an issue with the chalk paint and wax. We did the same amount of coats for chalk paint as you did and then applied the translucent wax. Unfortunately after the wax, the white paint came off in some spots and/or turned some spots a yellow-ish color. Is this because out brush might have been slightly damp or did we not wait long enough before waxing? Any recommendations? We were thinking either applying another coat of paint, allowing it to dry longer, then using a dry new brush, or getting the white wax instead of the translucent.
Sometimes the type of wood can cause the yellowing. We have had a few projects where knots in the wood caused it to yellow. I wish I had a way to help prevent it but I haven’t figured it out yet. Sorry!
Hello!
I love how you table turned out. On the top of the table, did you sand with the same paper AND a sander, or use the sander with those grit papers you mentioned?
Thanks!
Gretchen
Hi,
I’m glad you like how the table turned out. For the top, we used the power sander with the grits listed. Around the eges, we did hand sand because there were some edges that were easier to get by hand. Hope that helps!
Have you ever used or had any luck with a deglosser instead of all of the sanding?? I had someone say it worked well for them and never sand. Just trying to get another’s input as I really love how yours turned out!
I’ve never used a deglosser before. I wish I could help you there. We’ve always sanded and then refinished it.
Hi! I love your post and am following your steps to paint the legs of our old wooden table nook! But, what brush did you use for the chalk paint?! Do you mean the foam poly brush? The one with the chiseled edge and is foamy and squishy like for kid’s craft projects?? I have heard things about using bristle brushes but they leave brush strokes and I love the clean look you have and want it smooth. Thank you!!
Thanks for checking out the table and I’m glad you liked it. For the chalk paint, I used a bristle brush but it was one with soft, short bristles you can get at Home Depot. I made sure to apply the paint and then slowly smooth it out with gentle paint strokes before it had a chance to dry. Once the paint was on, I put the creme wax over it and I think that helped give it a smooth finish. I hope your table nook turns out awesome, I’d love to see what it looks like when you’re done!
Cassie
Hello,
I love your farmhouse table. I have a very similar table with four chairs that we bought 20 years ago in the beautiful 90’s oak. I am in the process of sanding the table down. I was wondering if you actually sanded down to the the bare wood? I refinished my hardwood floors last year and had to sand to the bare wood.
Thank you so much for sharing your experience. I am looking forward to an updated farmhouse table.
Kerri
Hi Kerry,
Thanks for checking out the post and I’m glad you like how the table turned out. When we sanded ours we did take it down to bare wood. It had a dark stain and thick layer of varnish on there that we wanted to get off so it wouldn’t show through the white chalk paint. It’s quite a pain to sand it all the way down, but we’re glad we did it!
Good luck on your table and feel free to share pictures with us when you’re done!
David
Your table is beautiful! I am thinking about painting mine the same way, but am a little scared about ruining it. One question I have is how do you take care of the top finish? Do you have to use coasters? Can you clean it with a wet cloth? Thank you for sharing this great tutorial!
Denise
Hi Denise,
Thanks for checking out the table and I’m glad you like it! We used a couple coats of polyurethane on the top to protect it. The poly protects it pretty well. We don’t have to worry about using coasters or anything like that. It forms a waterproof layer so we can wipe it down with a wet cloth or even sanitizing wipes and it (aside from a few scratches from the kids) still looks like new! I hope that helps.
David
What if I used a stain with the poly already in it?
Hi Kacey,
I’ve seen those before but haven’t tried them. I’m sure they work, but my preference is to stain and let it dry thoroughly before I put the poly on. For the table, I put several coats of poly on it to give it a nice thick protective layer.
Thanks for checking out our post!
David
Hello😊
Absolutely love your table. You’ve inspired me to do one of my own. My oak table is pretty dark as well. I’ll definitely sand the top and I was going to sand the base as well. But I saw that you used chalk paint and said you didn’t have to sand the base if you use chalk paint. Have you use chalk paint on other furniture that had varnish on it? And did the paint hold or did it start to peel? It would be wonderful to save some steps.😉
I’m glad that you liked the table! We’ve use chalk paint quite a bit but this was the first time we used it on a project that had varnish. Although the paint says you can get away without sanding, I still like the idea of at least a little sanding. It will help break up the varnish a little bit and give the paint something to hold on to. Sanding is my least favorite part of woodworking, but it tends to be a pretty important step lol
How many jars of chalk paint did you need for this??
Thank You!
Love the table!
Hi Katie,
Thanks for checking out the table and I’m glad you liked it. I honestly can’t remember how much paint we used on it, we did this project a while ago, but I would recommend starting with one container of paint if you’re doing a similar project. The chalk paint seemed to go pretty far for the projects we used it on.
Cassie
So excited to take this tutorial and try it out myself! Did you do the polyurethane on the whole table, or just over the stain? Also, I’m wanting to do some chairs to match. Would you follow the same steps? I’m wanting to paint the back and legs white and stain the seat. Got any other advice or tips?
Hi Jessilynn,
Thanks for checking out the table project and I’m glad you liked it! We only used the polyurethane on the stained portion. Everywhere that was white, we covered with a crème wax that protected the chalk paint. If you wanted to do this same style to chairs, I would follow the same process. We built a bench for a different table we built and followed this process. Put 2-3 coats of poly on the chair seats to really give them a good protective layer! Good luck and we’d love to see how your table turns out!
Love this! I have an older table and was thinking of just doing the legs white. I like the color of the top. Would the steps be any different for just the legs?
Hi Marielle,
Thanks for checking out the table and I’m glad you liked it! You should be fine to follow the same steps for the legs. I’d just do a light sanding on the legs before you put the chalk paint on. The paint brand claims you don’t have to, but I like to do it to make sure the paint holds good. Then cover the chalk paint with the creme wax and you should be good to go!
David
You have inspired me! I’m going to give it a try with my current table. We bought it new 10yrs ago and had 3 little kids! They are not so little now (watch out that happens fast) and the table needs to be rescued from their abuse LOL! I so appreciate all your timely answers and will go through all the questions again before I get started! I especially appreciate how you handled the negative, unkind, unnecessary comment. Thanks so much for sharing your pretty table and all the steps! Finger crossed for mine!
Hi Nichole,
Thanks for visiting the post and I’m glad you liked how our table turned out! I’m excited to hear that you’re going to start working on yours! I can only imagine ours will need some love again after the kids get a little older lol.
I’d love to see how yours turns out when you’re all done. Feel free to send us an email with any questions you have along the way and pics of the finished project when you’re done!
Thanks,
Cassie
I have the exact same table pretty much and I have all of the supplies suggested
Are you saying I don’t have to waste my time sanding the base because I’m using the chalk finish you suggested. Thanks in advance
Hi Dave,
I believe with Chalk Paint you can get by without sanding first if you don’t want to. We sanded ours because it had a pretty thick layer of lacquer on there that I wanted to break up. I wanted to make sure the chalk paint stuck to it pretty good. I can’t speak to how the chalk paint holds up if you don’t sand first, but I can say that ours has held up really well since we painted it. Our two little kids put it through the ringer and the paint still looks great. If you’re not looking to sand the base, admittedly it’s a pain, you should be fine if you use the chalk paint.
Thanks for checking out the post,
David
I just bought a round table on FB Marketplace, but it has the dated carved vine with leaves on the lip, should I keep it or cut it off the table was only $20, so I don’t want to screw it up. I know that’s not really the “farmhouse” transformation that I see and love. But wondering if I can make it “work.” Suggestions?
Hi Kimberly,
Thanks for checking out the post! That sounds like a pretty good deal for a table. I would be hesitant to try and remove decorative carvings on the edges. It might ruin the table or be extremely hard to repair once you cut it off. I would look to try and preserve it and just chalk it up as a unique feature on the table.
Good luck and I’d love to hear what you end up doing with it!
David
Hi Kimberly, I hope you don’t mind me chiming in LoL but I was thinking, you might be able to fill in that decorative carving on your table with I think it’s called Bondo. You’ll level it then sand it to be flush with the table. Zeb at JamiRayVintage.com has several videos where he’s using bondo for these types of issues. Good luck! ?
Hi Jackie,
That’s a pretty good idea, thanks for sharing it! If you plan to stain that part with the filler, I would test the stain on the filler first. Sometimes wood fillers don’t take stain the same as normal wood.
Your table looks amazing! Thank you for the tutorial, I’m planning on following it to refinish my own table. I had a question about the Americana Decor Creme Wax. Why did you decide to use the wax instead of the varnish by the same brand? I’m refinishing my chairs as well and when looking into the products it recommends the varnish for items that get more use. So I’m thinking I might need to use the varnish instead of the wax, especially for the chairs.. I was wondering what your thoughts on this were and if you had any experience using the varnish. Thanks so much for your help and for this awesome tutorial.
Thanks Stephanie! I’m glad you liked the table.
We chose the wax to cover the base of the table. Mostly because we read a lot of reviews from people that were happy with it. There wasn’t any real science behind it but it’s held up pretty well 🙂
I haven’t ever used a varnish, but we have used Polyurethane on quite a few projects and it does a good job of protecting the projects. We used Poly on the table top in this project and on a bench that we built. Every time it’s held up to the abuse of our two little kids. I think I linked to the type we used in this post. I highly recommend it for it’s durability and ease of application. I don’t think you can go wrong with it.
I’d love to see how your table turns out when you’re done!
Thanks,
David
Love this project! We are in the process of redoing an old table we just purchased on Facebook Marketplace. I love the stain you used and I’m purchasing it from Home Depot…just curious how many coats y’all did you achieve this color?
Thanks for the input!☺️
Hi Stephanie!
Thanks for checking out the table project and I’m glad you liked it. We did two coats of the stain on the table top to get that nice dark color. Make sure you sand it down really good first and then use tack cloths to remove all the dust residue. After the stain dries, we did 2-3 layers of polyurethane on top of that. I can say that our table has taken a beating from our two little kids and it’s held up well. That thick poly coat really helps!
Good luck on your project and we’d love to see pictures when you’re done!
Thanks,
David
Hi, when you do the polyurethane, do you do the whole table or just the stained top? Thank you
Hi Cari,
We just put the poly on the stained top of the table. We used a wax crème on the base of the table over the top of the white chaulk paint.
Hi I am currently trying to do the same project. Buying a used table and turning it into a farmhouse style table. Only question I have is I would like for my table to look distressed. Would I distress it before I add the sealing coat? And how exactly would I distress it? Any tips
Hi Kathy,
I would distress it before you put the sealing coat on. One way you can try to give it the distressed look is to lightly sand it on any corners or edges. I’d recommend starting in a spot that isn’t easily visible just in case you end up not liking how it looks. You can always repaint the spot you start without it being noticeable 🙂 Good luck with the project and we’d love to see how it turns out when it’s done!
David
Love what you did with the table! I have one like it and I think I’m going to try doing the same to mine.
What kind of foam brushes did you use?
Thanks,
Kathy
Hi Kathy,
I’m glad you like how the table turned out. It was a really fun project. We ended up just using the cheap foam brushes from Home Depot. I think there were about 2in wide. Good luck on your table project!
David
This is a great makeover! I recently redid a dresser using chalk paint and gel stain (too lazy to sand) and think it turned out pretty well!
Hi Erin,
Thanks for visiting and I’m glad you liked how the table turned out. I took a look at your dresser and it turned out beautiful. Nice work!
Thanks for checking out our dresser and for the kinds words! I am excited to see what other cool DIY projects we may have in common!
What did you do with the chairs? Did you go with dark stain or chalk paint. I’m curious as I want to do something similar. I love how the table turned out.
Hi Sunny,
Thanks for visiting, I’m glad you liked how the table turned out. We bought some chairs online to go with the table. I can try to find a link to them if you’re interested, just shoot us an email?
Thanks,
David
I have this exact table. I’m wanting to do something similar to mine. I don’t have the leaf and I’m stuck staring at the crack in the middle of my table. Do you have any suggestions on what I could do to fill in the crack and make it a crackless table?
Hi Ashleigh,
If your table is like ours, I think it would be pretty tough to make the table top a solid top without replacing the actual top piece. I’m afraid if you tried to glue the two halves together and then fill it with wood filler to smooth it out, it would end up looking funny and eventually crack. You could try cutting something similar to what the leaf would look like and gluing it in the middle. You would have to plane each side and have it fit really flush. Then you would have to sand the top to smooth it all out. Unfortunately, I think it might be a ton of work. If you do go for it, please share a picture. I’m excited to see how your table turns out either way!
David
I have the exact table & want to do the same, when you put on the wax, how did you apply it & how many coats did you use?
Hi Margie,
Thanks for checking out our post! I’m glad you liked how the table turned out. When we did the wax, we did 2 coats on it and it seems to be holding up pretty well. We applied the wax with a paint brush. It went on pretty easy. I’d love to see how your table turns out when it’s done!
Good luck with the project!!
David
Hi there! I’ve been wanting to do this with my exact table as well. Yours turned out beautiful!! I am just undecided on the stain color because I want to use a light gray chalk paint for the bottom to match mu remodeled kitchen I have dreamt up in my head ?
I also have four matching chairs but am really kind of at a loss about how to do them?? Ugh.
Did you use the poly on the bottom part with the chaulk paint or just the top? I’m assuming just the top since you mentioned using the wax after the chaulk paint!
Thanks for any info or tips you might be able to bestow upon me ?
Hi Denise,
If you’re undecided on stain colors still, try getting a piece of oak (assuming your table is made of oak like ours was) and test some stain colors on it. That’s a cheap way to decide on a stain color.
We only used Poly on the top of the table. We used a wax coating on the bottom and applied 2 layers. It’s held up pretty well.
Hey there I love this idea. I have oval long style table and 4 chairs. I was wondering if I painted the chairs with the chalk paint as well would I put the poly over the chairs after it’s dried?
Hi Jordan,
We made a bench seat for another table we did and we put a coat of poly over the top to protect the seating surface. It turned out pretty good and protected it from spills and scratches. You could put a coat of poly over the chair tops and it should be fine.
Vandalism! You took a potentially beautiful example of classic hardwood furniture and turned it into a yuppy-inspired eyesore that looks most appropriate for a daycare. Some years ago, I rescued a very similar, possibly identical piece from a bunch of poker-playing overage frat-boys, stripped off layers of carpet underlay and green felt, and restored it to its former dignity as a finely-made piece of 20th century production craftsmanship, using its (thankfully) untouched centre leaf as a guide. You people would paint a polyester leisure suit on an original Rockwell just to make it “fresh and updated”!
I doubt that my comment will ever be reprinted. Since all the comments printed so far are universally overflowing with praise, it’s obvious that you have edited out any that are less than fully impressed with your dimestore “improvements”.
Hi Roger,
Thank you for stopping by and checking out this post. I’m sorry that you didn’t enjoy our work. Luckily for you, you don’t have to stare at it every day. We are happy with how it turned out as it went well with the decor of our house.
Have a great day,
David
I love what you have done to the table. I had one just like it, and gave it to my daughter. I bought new,, looking back I wish I would have kept it, and done this to it. I told her if she ever wants to get rid of it, to please give it back to me. Again, great job and now it’s more beautiful than ever!
Hi Lorie,
Thanks for checking out the post! I’m glad you liked how the table turned out. We are happy with how it turned out, if your daughter gives your table back to you or if she is looking for an upgrade on it, this was a fairly easy project and can be completed in a day or two.
Let us know if you need any help!
Roger,
You clearly have some mental issues.
Roger,
Was this absolutely necessary? Maybe we should go back to daycare and address, “if you don’t have something nice to say, don’t say it at all.”
Good riddance!
Found this on Pinterest – what a beautiful job! This came out so well and you make it look so simple that I’m tempted to do the same with our identical hand-me-down table that is in super rough shape. Can you estimate how long this took you, from start to finish? It looks like you did it all in a day, but just curious!
Hi Jaime!
Thanks for checking out the post and I’m glad you loved how the table turned out. If you’re thinking about doing your own table makeover I think you should go for it!! This took us two days to finish. The only reason it took two days was because we wanted to let the stain on the table top sit for a day before we put the poly over it. It ended up going a lot faster than we thought it would.
Hi Jaime!
I’m glad you loved how the table turned out! If you’re thinking about doing your own table makeover I think you should go for it!! This took us two days to finish. The only reason it took two days was because we wanted to let the stain on the table top sit for a day before we put the poly over it. It ended up going a lot faster than we thought it would.
This process is not simple. It takes loafs6of due diligence. I am 60, a retired Interior Designer, an artist, and am passionate about furniture restorating and refinishing. I have never used a sander on a piece of furniture and have restored over 300 pieces. I use stripper to remove all manner of issues. I said lightly between coats of paint, etc. My finished are superb, and have sold pieces for a few grand. The point is that sanding always takes the wood with it. Do your homework.
Thanks for the input!
Thank you for showing your table transformation. I have exactly the same table but we removed the top part of the pedastal and converted it to a coffee table., keeping the legs. We removed the varnish and waxed it so it has a much lighter oak colour than your starting photos. From an unused piece of furniture we now use it everyday in our family room. It’s also interesting that the same piece of furniture is something I inherited and we live in New Zealand.
Stacey, I LOVE your story! It’s pretty neat that we both have the same piece of furniture when we live on the opposite sides of the world, lol. I would love to see your coffee table, it sounds amazing!!
Love your table! I’m wanting to redo my pedestal table and was wondering do you always have to sand the base if your using the chalk paint?
Hey Debbie! No, you do not need to sand the base of the table if you are using chalk paint. At the time I wasn’t sure if I was going to use chalk paint or regular white paint.. So I sanded it all. I used chalk paint on another farmhouse table that we built by hand. I didn’t sand it and it turned out great and the chalk paint is still holding up just fine =)
Hi, I really love the look., it’s really professional. What colour stain did you use and from which company? I’m redoing my table and love the dark brown you’ve used. thanks in advance 🙂
Hi Leah! I’m glad you loved the table. We really love how it turned out!! The stain we used is made by Varathane and is the Kona color. We got it at Home Depot in the paint area. We love how the dark Kona color contrasts with the white base.
I love your table i did mine almost exactly the same! I cant figure out how to post a picture of it though
Hey Denise! Thank you, I bet your table turned out beautifully. Isn’t it amazing how a little paint, stain, and love can transform a table =)
Hey, love this look! I’m redoing my old table right now. Did you use a foam or paint brush to apply the chalk paint and stain?
Hey Heidi! We used rags to stain the top of the table. Rub it on, let it sit a few minutes then wipe off the excess stain. Repeat until you get the desired color you want. =) For the chalk paint, I used just a normal paint brush. There are paintbrushes specifically used for “chalk paint” but they are expensive. A normal paint brush worked just fine. We used a foam brush to apply the poly on the table top once the stain was completely dry. I hope that helps!
I have a table very much like the one you did the “redo” on. I have NEVER attempted anything like this before, but I have read your post and I think with what you are saying, I can do this project. I have made a list of everything I need and I am going to Home Depot tomorrow to buy everything I need to do this. I would be happy if my project turns out half as nice as your table. I think it is beautiful. I love the paint with the stain idea. I want my table to look just like yours. Wish me luck. I may have questions when I get into this, but I feel good about starting this. Thanks for sharing this idea with us. I’m like a lot of people, I can’t afford to purchase a fancy table like that…..I have to try to make mine. I bought my table with 4 chairs for $25.00. I’m going to paint my chairs white….and I may destress them a little. By the way, I am doing a complete décor “redo” in my apartment. I’m going Farmhouse. So this table will fit right into my plans. Thanks!!!
Hey Kathi, I can’t wait to see how your table turns out. Its a lot of work up front but it will be worth it. That’s awesome that you were able to find a table and chairs for that price. I love the Farmhouse look, that’s how our house is decorated as well. If you have any questions while redoing your table feel free to message us! Good luck!
This table looks amazing!! Can you tell me how you sanded the rounded edge, was it with the electric sander or by hand? I am working on my own table redo and afraid of sanding the rounded edges.
Thank you!! I’m glad you like the table! For the rounded edges we ended up hand sanding them. It took a little longer but we were afraid of over sanding them if we used the electric palm sander. Don’t be afraid to sand the rounded edges, just take your time with it and it will turn out great!! Can’t wait to see the finished product!
Did you use the foam brushes to apply the polyurethane? There’s no mention of them or any techniques or many tips for the polyurethane stage. Is it pretty easy/straightforward?
That’s a great question! Yes, we used the foam brushes to put the poly on. I made long, slow strokes to avoid any bubbles. On most of our projects where we use poly I do 3-4 coats using a new foam brush each time. Make sure the surface is free of lint or any other debris before you put the poly down so you get a nice smooth finish. Follow the manufacturers recommended wait times between coats and you should be good to go!
What did u do with the chairs
We actually bought the chairs off Wayfair a while ago. We loved the rustic look they had!
Was this a laminate-topped table? I am wanting to redo our table and 2 leaves but it is all laminate on top. Will sanding remove the shiny laminate so stain or paint will stick? Your table is beautiful, by the way!
Hi Susie,
I’m glad you love the table! It was a really fun project. The table is solid wood, no laminate, but it had a really thick coat of varnish on the whole thing to keep it from getting scratched. The hardest part of the whole project was sanding down the varnish so we could get the paint and stain to stick. Feel free to email me pictures of the table you’re going to redo and I’ll see if I can give you some tips. Send it to [email protected] if you want!
I loved the tutorial – I can’t wait to try it! Does using the was creme wax with the chalk paint make it more durable and less prone to scuffing? We have little boys playing w/ their cars all over the place !
Hi Jamie,
I’m glad you loved the table makeover. We’re so glad we did this and didn’t buy a new $1000 table. We have two little kids who beat up on our table pretty good and it holds up pretty well. We’ve used that combination a couple times and it works out pretty well.
Nice job! I love the new look! What a great way to take an older piece of furniture and make it current!
Thanks, Melissa! It definitely gave it a whole new look.
I love the paint and varnish combo!
Thank you! I love it too. We use that combo on pretty much everything we make =)
What an amazing tutorial, what a makeover! The step by step photos are super helpful!
Thanks! I’m glad you liked it.